
The Vendor Module in Webtrix24 Rental CRM helps rental businesses maintain vendor information in one centralized place. Users can create vendors, store their contact and GST details, and manage vendor records from the Vendor List View.
How to Open the Vendor Module
To open the Vendor Module:
- Log in to Webtrix24 Rental CRM.
- Go to Vendors from the left-side menu.
- The Vendors List View opens.
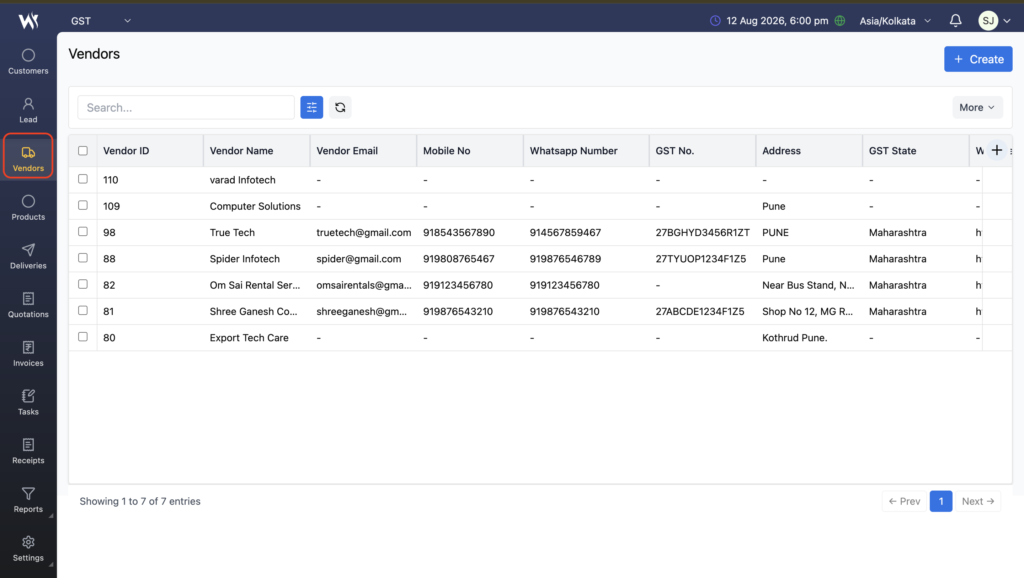
Vendor List View
The Vendor List View displays all vendors added to the system.
The list can include details such as:
- Vendor ID
- Vendor Name
- Vendor Email
- Mobile Number
- WhatsApp Number
- GST Number
- Address
- GST State
The list also provides a Search option to quickly find vendor records.
Create a Vendor
To create a new vendor:
- Open the Vendors module.
- Click the + Create button in the top-right corner.
- The Create Vendor form opens.
- Enter the required vendor information.
- Click Save.
The new vendor is then added to the Vendor List View.
Vendor Form Details
The Create Vendor form provides fields for storing vendor information.
Required Field
- Vendor Name – This is a mandatory field.
Optional Vendor Details
Users can enter additional information such as:
- Address
- Zipcode
- Vendor Email
- Mobile Number
- WhatsApp Number
- GST Number
- GST State
- Website
This allows businesses to maintain complete vendor contact and tax information.
Vendor Email Validation
The Vendor Email field has a uniqueness validation.
If an email address that is already associated with another vendor is entered, the system displays an error and does not allow the duplicate vendor email to be saved.
This helps maintain unique vendor contact information.
Save Vendor
After entering the vendor details:
- Click Save.
- The vendor record is created successfully.
- The newly created vendor appears in the Vendor List View.
The Save & New option is also available when creating a vendor. It can be used when users want to save the current vendor and immediately add another vendor.
Vendor Information Management
The Vendor Module provides a centralized location to maintain vendor information, including:
- Business/contact details
- Email information
- Mobile and WhatsApp numbers
- GST details
- Address
- Website
Keeping this information in one place makes vendor records easier to manage and access.
Benefits of the Vendor Module
The Vendor Module helps rental businesses:
- Maintain vendor records in one place.
- Store vendor contact information.
- Maintain GST and state details.
- Quickly search for vendors.
- Prevent duplicate vendor email addresses.
- Add multiple vendors efficiently using Save & New.
- Keep vendor information organized for rental business operations.
Frequently Asked Questions
What is the Vendor Module in Webtrix24?
The Vendor Module is used to create and manage vendor records, including vendor contact, address, GST, and website information.
How do I create a vendor in Webtrix24?
Go to Vendors → + Create, enter the vendor details, and click Save.
Is Vendor Name mandatory?
Yes. Vendor Name is the required field in the Create Vendor form.
Can I add vendor contact details?
Yes. You can add the vendor’s email, mobile number, WhatsApp number, address, and website.
Can I store GST details for a vendor?
Yes. The vendor form provides GST Number and GST State fields.
Can two vendors have the same email address?
No. The Vendor Email must be unique. A duplicate email address triggers a validation error.
Can I add multiple vendors quickly?
Yes. After saving a vendor, you can use Save & New to continue creating another vendor.
Where can I see the vendors I have created?
Created vendors are displayed in the Vendor List View under the Vendors module.
Can I search for a vendor?
Yes. The Vendor List View provides a Search option to find vendor records.